- Connect a battery charger to the vehicle.
NOTE: Before beginning the reprogramming procedure, explain the following points to the customer regarding the MyMazda App.
DO NOT use the remote control features (remote engine start/stop, remote door lock/unlock, turn on/off hazard warning lights) with the MyMazda App during the repair.
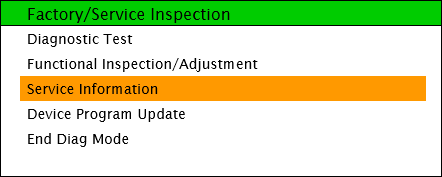
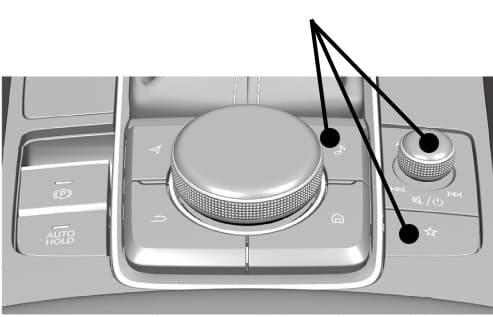
Malfunction information may be sent for the DTC detected during the repair. - Confirm the part number of the remote tuner: Press and hold the “Volume” knob, then press and hold the “Entertainment” and “Favorites” buttons at the same time for 3-5 seconds. The “Factory/Service Inspection” screen will appear.
- Sending update file(s)
- Checking update file(s)
- Installing update file(s)
- Completed
- If a warning message like “Vehicle network error” appears, continue the updating.
- If a red warning message “Update Error” appears, lock all doors and wait for 5 minutes or more so that the vehicle goes into sleep mode, then turn on the ACC position.
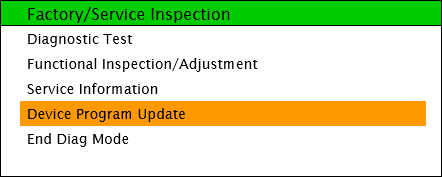
2A. Select “Service Information” on the screen below
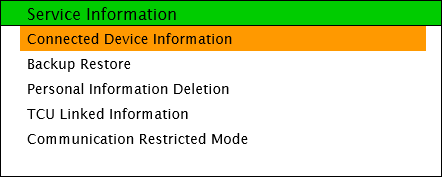
2B. Select “Connected Device Information”
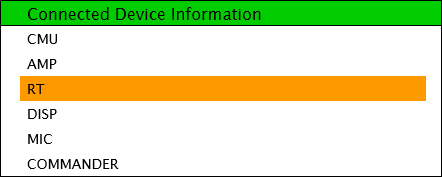
2C. Select “RT”
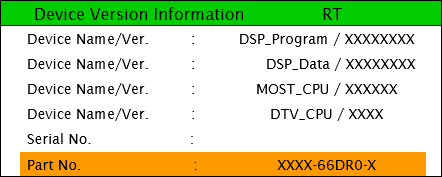
2D. Check “Part No.” of the RT
3. Download the update file.
4. Format a USB flash drive.
5. Copy the latest software for the vehicle to a USB flash drive.
6. Prepare the USB flash drive which contains the software file(s) to be installed.
7. Turn the ignition switch to ON (engine OFF) with the push button start.
PHEV: While depressing the brake pedal, push the power switch to turn the power ON (READY ON).
CAUTION: To avoid damaging the remote tuner, do not remove the USB flash drive or turn the ignition switch OFF while reprogramming.
8. Insert the USB flash drive into any USB port.
9. Press and hold the “Volume” knob, then press and hold the “Entertainment” and “Favorites” buttons at the same time for 3-5 seconds. The “Factory/Service Inspection” screen will appear. 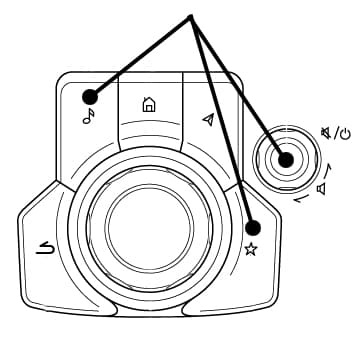
10. Select “Device Program Update” on the screen below.
11. Select “System Update” on the screen below.

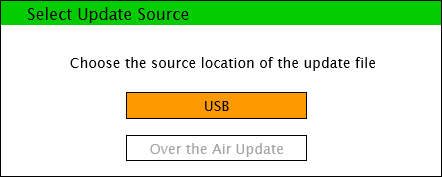
12. Select “USB” on the screen below to start checking for the update file.
NOTE: If the “Update file(s) not found” message appears, the wrong file may be stored in the USB flash drive or the vehicle has already been updated.
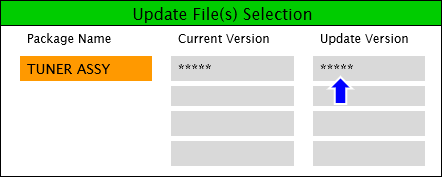
13. Confirm the correct software version is shown under “Update Version” and select “TUNER ASSY” on the screen below.
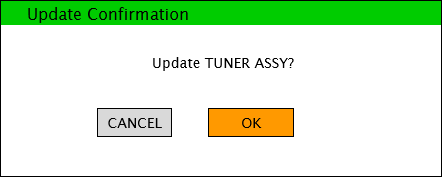
14. Select “OK” on the screen below and wait until the update (loading) is completed.
NOTE: DO NOT switch the ignition OFF until the update (loading) is completed.
15. Select “OK” on the screen below. The data update will start automatically after 10 seconds if “OK” is not selected.

NOTE: After selecting “OK”, the system will reboot and the display will turn black, followed by screens below:
16. Wait until update is completed (takes approx. 10 minutes).
NOTE:
17. When the “Completed” screen appears, press the commander knob to reboot the system.
18. After rebooting is completed, remove the USB flash drive from the USB port.
19. Repeat Step 9 by pressing and holding the “Volume” knob, then press and hold the “Entertainment” and “Favorites” buttons at the same time for 3-5 seconds. The “Factory/Service Inspection” screen will appear.
0 Comments for “How to check and update your Remote Tuner Model ID / RT Model ID Mazda Connect 2?”